


Describe
Our designers look for inspiration from the beautiful nature
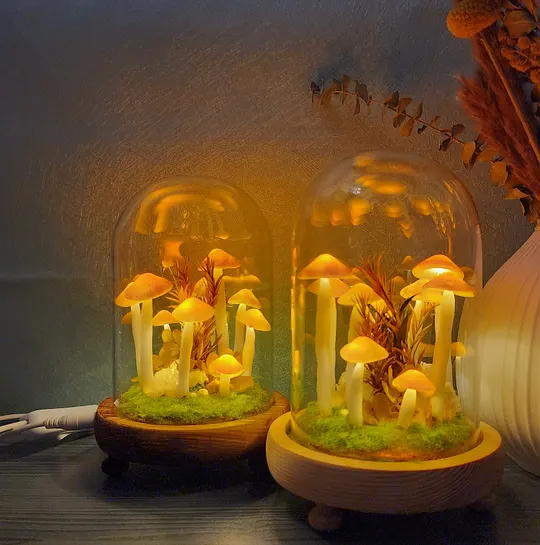
He embedded a small LED light in the “mushroom”
Make a messy original ecological home lighting
Make people fall in love at a glance
Mushrooms always appear in fairy tales, full of mysterious and magical colors
Let it be a lamp, the entrance to the fantasy journey will only tell you the answer after you fall asleep.

Lampshade material: glass
Dimension:7*14cm(mm)
Switch type:button type
Light color:mushroom light
Light source power:5W and below (W)
Contains:
1. 7*14 glass
2. Crystal material
3. Simulation powder
4. led light string
5. glue
6. Brush glue pen
7.glue stick

What’s in the material bag?
Glass lampshade, auxiliary tools, paintbrush, clay, table lamp base, latex, paint, hot melt glue, grass powder.
Reminder: After you finish making it, let the mushroom lamp dry for two nights, and then cover the glass cover.
Production steps:
Step 1: Twist the filament out of the approximate shape and height of the mushroom. (Probably made 6-7 different mushrooms, the remaining filaments can be spread on the bottom)
Note: The distance between USB filament lamps is 5cm. The manufacturing process is the same as that of the battery, except that there will be lights on the USB-style mushroom pole, which does not affect the manufacturing. The height of the mushrooms can be set according to your preference.
Step 2: Arrange the distance and height of the mushrooms, and fix the bottom of the filament with hot melt glue.
Step 3: Cover the bottom with clay, the high point of the clay in the middle makes people feel like a mound, making a curved lawn. And knead it into similar-sized stems.
Note: 1. The clay needs to be encapsulated.
Note: 2. The stems can be made into thick and thin mushroom stems according to your preference. Mushroom stems need to be rubbed evenly by hand. In the process of making mushroom stems, there should be no traces of broken wires, otherwise the mushroom stems will crack when the clay dries.
Step 4: Use clay to assist paving tools to make bacteria caps, and fix the rods and caps with latex.
Step 5: Apply a layer of brown paint on the bottom and let it dry after painting.
Step 6: When the paint is dry, apply latex evenly.
Step 7: Sprinkle grass powder.
Step 8: Leave it for a day or two, wait until the clay is completely dry, cover with a glass cover, and finish.
Reviews
There are no reviews yet.


Be the first to review “Hand-Made Original Night Light/Cute Retro Mushroom Night Light /Gift Light/Handmade mushroom lamp”